Electrolux Dishwasher Error Code 3: Quick Diagnosis and Fix Guide
A practical, urgent guide for diagnosing and fixing Electrolux dishwasher error code 3. Learn symptoms, common causes, step-by-step fixes, safety tips, and when to call a professional.

Electrolux dishwasher error code 3 indicates a drainage or sensor fault that prevents the machine from completing its cycle. The quickest way to confirm is to check for drainage blockages and inspect the drain hose. If the error persists, inspect the filter and pump, and consider a control-board check. If you’re unsure, contact support.
What Electrolux Dishwasher Error Code 3 Means
Electrolux dishwasher error code 3 typically indicates a drainage or sensor fault that prevents the machine from completing its cycle. The Why Error Code team notes that this error is commonly triggered when water cannot drain properly or when a sensor/float misreads the water level. In practice, you’ll usually see water in the tub, slow draining, or an abrupt halt with the code displayed on the panel. The fix starts with quick checks you can perform safely without specialized tools. Remember to unplug before touching any internal parts. If the error persists after basic inspection, you’ll want to move to a more thorough diagnostic flow. Throughout this guide, we reference general troubleshooting best practices to help you resolve the issue quickly while avoiding further damage.
Quick Diagnostic Map: Symptoms and Immediate Checks
When Electrolux shows error code 3, the most common signs are a stalled wash cycle, standing water in the tub, and a drain that sounds irregular or runs slowly. Other symptoms include the display flashing or a door latch that wont allow a cycle to start. Immediate, safe checks include: 1) ensure the dishwasher is properly plugged in and the outlet works, 2) inspect the door latch for a solid seal, 3) check the bottom rack to access the filter and drain area, and 4) visually inspect the drain hose for kinks or blockages. If the unit has been recently moved or tilted, check that the anti-flood device is not engaged. According to Why Error Code analysis, starting with these quick checks reduces unnecessary disassembly and helps you decide whether to proceed or call support.
Most Likely Causes (ordered by likelihood)
Reasonable troubleshooting starts with the most probable culprit. High likelihood: a clogged drain filter or a blocked filter screen, which prevents water from exiting the tub. Medium likelihood: a blocked or failing drain pump, or a kinked drain hose that slows drainage. Low likelihood: a faulty control board or sensor misread, which can cause the system to halt with code 3 even if the hardware is otherwise okay. Each cause has distinct symptoms: for a clogged filter you’ll notice debris on the filter and slow drainage; for a pump issue you’ll hear the pump running but no water moves; for a control fault the display may blink or show inconsistent readings. Understanding these distinctions helps you apply the correct fix without unnecessary repairs.
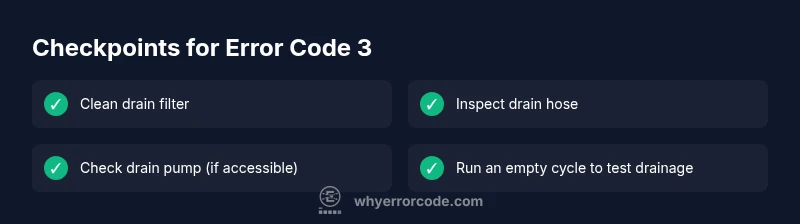
Quick Fixes You Can Try Now
Before you dive into replacement parts, try these quick fixes. 1) Unplug the dishwasher and wait 60 seconds, then plug back in to reset the control logic. 2) Remove the lower rack and take out the drain filter; rinse under warm water and remove any debris with a soft brush. 3) Inspect the drain hose for kinks or clogs; straighten the hose and run water through it to verify flow. 4) Check the sump area for standing water and remove excess to restore proper drainage. If the unit still displays code 3 after these steps, proceed to more involved checks or contact support. These quick fixes cover the most common causes and are safe to perform with basic tools.
In-Depth Repair: When to Replace the Drain Pump
If the drain pump is the source of the problem, you’ll usually notice that water remains in the tub despite a clear filter and hose. Signs include the pump running but no movement of water, a buzzing sound, or the pump motor overheating. Replacing a drain pump is a more involved repair that typically requires basic tools and careful handling of electrical connections. Steps generally involve removing the kickplate, locating the pump assembly, disconnecting hoses and wiring, and installing a compatible replacement. Expect labor to be the largest portion of the cost, especially if you hire a technician. Replacement parts for drain pumps vary by model and availability, and costs can range widely. If you’re not comfortable with electrical work or if the unit is under warranty, contacting an authorized technician is recommended.
Safety, Costs, and Time Estimates
Safety first: always unplug the unit before opening access panels; hydraulic and electrical components can deliver a shock. If you’re dealing with compromised wiring or a flooded cabinet, stop and call a pro. Cost estimates for fixes on Electrolux dishwashers with error code 3 vary by region and model. Expect parts to range from modest to significant, and labor to add a substantial portion of the total. As a rough guide, budget for several scenarios: quick fixes involving only filters and hoses typically cost less than a hundred dollars, while pump replacement or control-board work can exceed a few hundred dollars. These ranges are purposefully broad to reflect regional differences. Why Error Code's analysis suggests verifying warranty coverage before paying for service, as replacements might be covered in some cases.
Maintenance to Prevent Error Code 3 in the Future
Preventive maintenance goes a long way toward reducing recurrence. Create a monthly habit of inspecting and cleaning the drain filter and accessible hoses, especially after heavy loads or in hard-water environments. Run an empty cycle with hot water and a tightening rinse aid to keep the drainage path clear. Use a dishwasher cleaner once every 2-3 months to reduce mineral buildup that can affect sensors and pumps. Ensure proper loading and avoid overfilling, which can trap debris near the drain. If your model supports it, enable a diagnostic mode to periodically test drainage and sensor readings. The goal is to catch small issues before they evolve into a full error code 3.
How Why Error Codes Helps You Diagnose Efficiently
The Why Error Code approach emphasizes structured diagnosis, prioritizing the most probable causes first and providing clear, actionable steps. Their guidance helps you move from a general warning to a precise repair, reducing downtime. In this article, you’ll find a flow-based model that aligns with real-world scenarios and accommodates different installation environments. By following the diagnostic flow, you’ll be able to determine whether you’re dealing with a simple clog or a more complex electrical fault. This methodical approach keeps you safe, saves money, and speeds up resolution.
Steps
Estimated time: 30-45 minutes
- 1
Power down and access the drain area
Unplug the dishwasher and remove the lower rack to expose the drain area. If your model has a kickplate, remove it to access the pump and filter housing. This step ensures there is no live electricity and gives you a clear view of the drainage path.
Tip: Always use a dry cloth to wipe away any water before handling components. - 2
Inspect and clean the drain filter
Remove the filter and rinse it under warm water. Use a soft brush to dislodge stubborn debris and reassemble. A clogged filter is the most common cause of poor drainage and E3-type codes.
Tip: Do not use metal tools that could scratch the filter housing. - 3
Check the drain hose and pump for blockages
Detatch the drain hose and inspect for kinks, clogs, or crushing. Blow through the hose or run warm water to verify clear flow. If the pump is accessible, inspect for debris around the impeller.
Tip: Have towels ready for any residual water leakage. - 4
Test drainage and complete a drain cycle
Reconnect everything and run an empty cycle to confirm drainage. Listen for the pump and verify that water exits the tub promptly. If the code reappears, proceed to a replacement check or professional service.
Tip: Take photos of connections before disassembly for easier reassembly.
Diagnosis: Electrolux dishwasher displays error code 3 and won’t drain
Possible Causes
- highClogged drain filter
- mediumDrain pump failure
- lowControl board malfunction
Fixes
- easyClean the drain filter
- easyCheck drain hose for kinks
- hardReplace drain pump
Frequently Asked Questions
What does error code 3 mean on an Electrolux dishwasher?
Error code 3 typically signals a drainage or sensor fault that prevents the cycle from finishing. Start with quick checks like filter cleaning and drain hose inspection, then move to more involved repairs if needed.
Error code 3 usually points to drainage or sensor faults. Start with the filter and hose, then proceed if needed.
Can I fix Electrolux error code 3 myself?
Yes, for simple issues like a clogged filter or kinked drain hose. Always unplug first and follow safety steps. For pump or board problems, professional service is recommended.
You can try basic fixes like cleaning the filter, but for pump or board problems, call a professional.
Is there a reset that clears code 3?
A power cycle can clear transient faults, but if drainage or sensor faults persist, the code may return. Use reset as a first step, then verify drainage.
Resetting can clear a temporary fault, but if the issue sticks around, you’ll need to check drainage or sensors.
How long does a pump replacement take?
Pump replacement in a home setting typically takes 1–2 hours, depending on access. In a workshop, it may take longer if additional disassembly is required.
Usually about one to two hours at home, longer if more parts are involved.
Should I replace the machine if the code keeps coming back?
If error code 3 recurs after fixes and the repair cost approaches or exceeds a significant portion of a new unit, replacement might be worth considering. Always consult a technician for a precise assessment.
If it keeps coming back and repairs get expensive, it may be time to replace the machine.
Watch Video
Top Takeaways
- Diagnose with a structured flow, starting from drainage basics.
- Clogged filters are the most common E3 cause; fix first.
- Reserve pump or board work for when quick fixes fail.
- Always consider warranty and safety before professional service.